///M3
Tech Procedure -
Stellar Alarm Installation with Euro Alarm LED
Every $40,000 car should have come with keyless entry and an alarm
standard, but unfortunately my car did not have this feature. Luckily
the car is still pre-wired for an alarm and since I am not interested
in having a million gadgets integrated into my car alarm, I chose to
pick a unit that would work with the pre-wiring of the car.
I ended up with the Stellar
BMWSTX made by Autoloc. I won't go into all the details, but this
alarm has just about everything I want in an alarm - works with pre-wiring,
alarm, keyless entry, and a shock sensor.
Fresh from my Angel Eye install, I scanned the install instructions
for about a day to get a good idea of what I'm doing (and also to allow
the temperature to warm above 20F). The Stellar kit, like most other
alarms features a blinking red LED that is mounted on the console (where
the heated seat and traction control buttons area). Stellar's, and evidently
BMWUSA's, solutions for this is drilling a hole in a blank console pop-out
and shoving an LED into the hole. Sadly this does not look clean and
doesn't match the interior. I first learned about the European Alarm
LED from a webpage
by Ron Stygar. The Euro Alarm LED is a unit consisting of a small printed
circuit board with an LED, some resistors, and a diode. This is a much
nicer and neater solution than an LED sticking through a hole in a blank!
I ordered the Euro Alarm LED, the connectors, and the pins from my
local dealer. I followed the instructions on Ron's webpage to the letter.
I cut the LED that came with the Stellar Alarm off and soldered and
heatshrinked the wires of the alarm connector to the pins. To my disappointment
I got no blinking when the alarm was armed! So I took the whole unit
apart again and check all my connection... but still nothing. I resurrected
the LED that came with the kit and sure enough it works. Faced with
the fact that the LED in the Euro Alarm LED wasn't going to work with
the Stellar Alarm, I broke out the Dremel tool and did some surgery.
Proceeding is the result of my project and some instructions and pictures
of the installation.
Lets first concentrate on setting up the Euro Alarm LED. The part is
a BMW Control lamp (part number 65 75 8 357 417) that sells for $17.30
retail. As it turns out, you won't need any additional parts from BMW
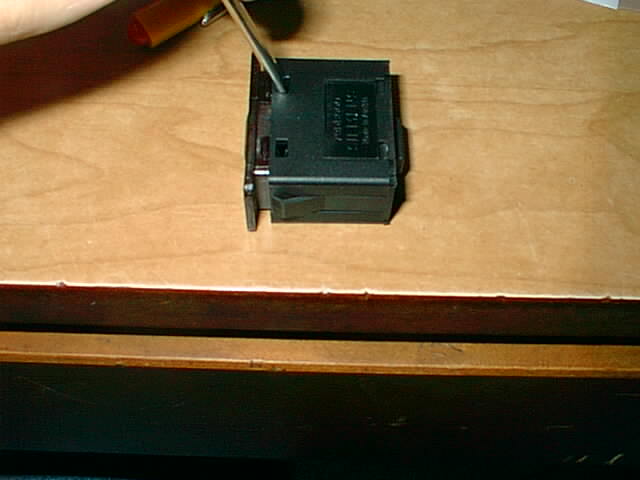
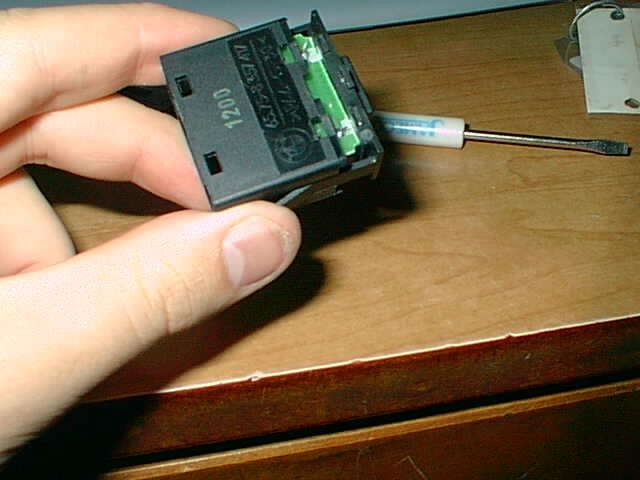
with my install. Prying open the case is a real bitch. As shown
in this picture I am prying off the top of the unit. I later learned
that you don't need to do this. Just try off the bottom (which is the
side with the connector pins). Be very gentle and patient. I used a
small flat head screwdriver to push in the tabs and pry the bottom off.
There are two tabs on each side so I even ended up using two screwdrivers
at one time. It is a pain, but keep working on it and you'll get it
open without breaking it.
Here you can see the middle piece with the printed circuit board sliding
out.
Here is the middle piece. To the left side of it is the pin connectors.
In the middle are the resistors and the diode. To the right is the LED.
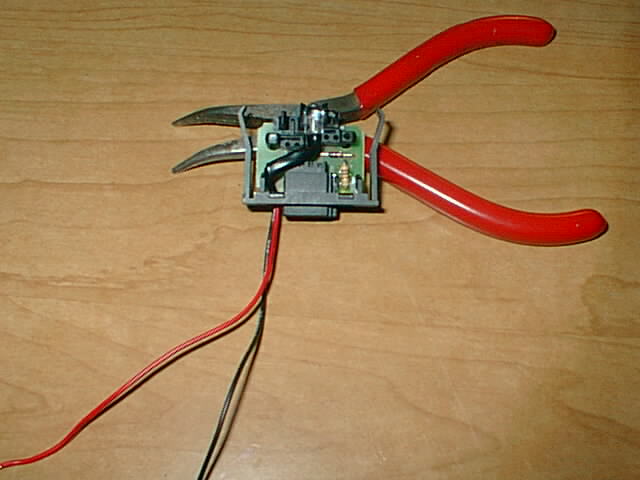
Now we start the destruction! Grab hold of the LED and rip it out. Take
a Dremel tool and start drilling down the black plastic area where the
LED leads mount into the PCB and drill out some of the surrounding plastic
area. Using the same drill but, drill a hole in the back of the piece
right next to the connector for the wires of the new LED to exit the
unit.

This picture below is what is left of the LED that came with the kit.
Basically there is an LED that is surrounded by the red plastic. I used
the cutting blade on my Dremel tool and very carefully
cut off the bottom and top areas avoiding the wires and the actual LED.
If you cut the bottom area and the top off the LED can be pushed out
of the plastic.
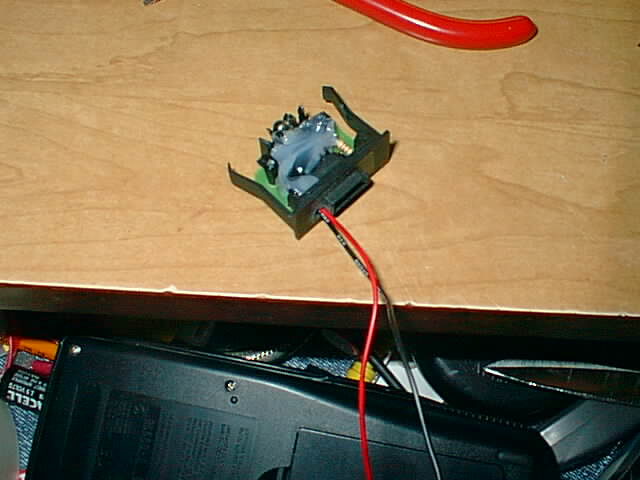
During the process one of the wires came off its LED lead. I carefully
soldered it back on and heatshrinked the two wires. Using the plastic
fingers (that I made sure not to Dremel-tool-away) I secured the Stellar
kit's LED into the Euro Alarm LED housing. Make sure that the LED is
as centered as possible. Run the wires out the hole you drilled.
I still had a nice tube of clear silicone sealant and it will help
hold everything in place nicely.
Close everything back up and now you've successfully modified the Euro
Alarm LED to work with the Stellar Kit. All nasty evidence of a hack
job is securely and neatly shielded away inside this case! Solder the
connector that connects to the alarm module to the two leads coming
out of the Euro Alarm LED unit.

Now to the real car alarm installation. Remove the glove compartment
by unscrewing the screws circled in red. Use a small flathead screwdriver
and pry off the cover to the light (marked by the arrow) and unplug
the wire and connector from the bulb. There is a 10mm bolt that you'll
have to take out and with this the glove compartment will come right
out.

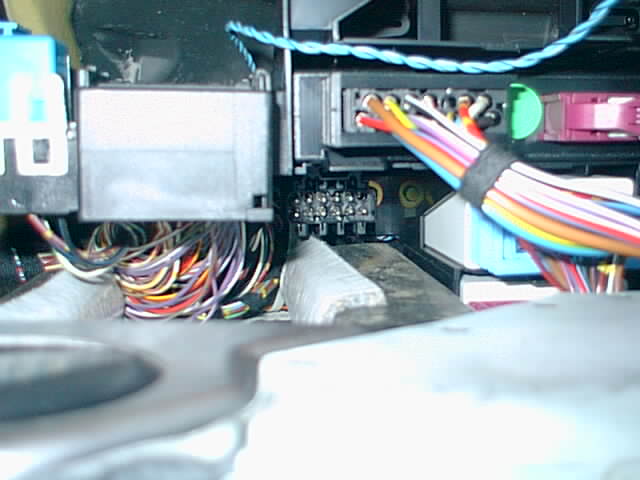
Buried in the nest of wires, way in back is the socket where the Stellar
wiring harness will connect.
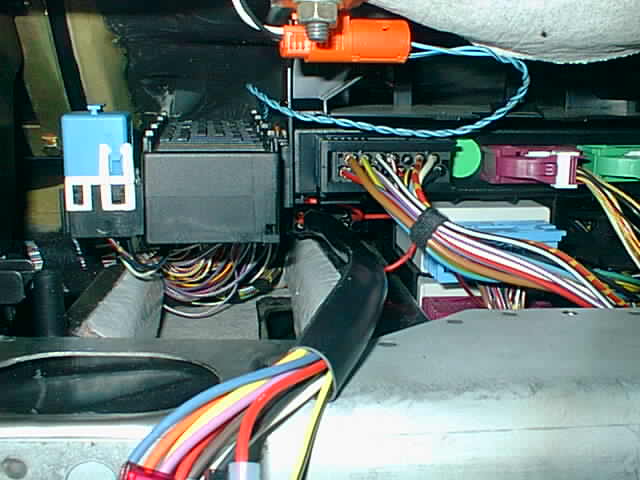
Here is a picture showing the harness plugged in. Good luck not scratching
your hands up doing this. Make sure that it is secured snugly.... really.
The instructions note that I may need to use a wire tap to connect a
red wire on the harness to a black female plug depending in the year
of the car. In my 98 M3, I searched and found no black female plug so
I skipped this step as instructed.
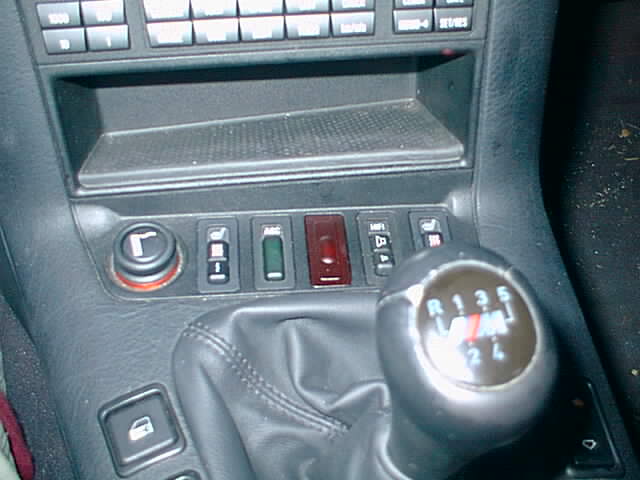
Now you need to connect up the Euro Alarm LED to the console. I have
a manual transmission and all I had to do was to pull the leather boot
out and pop out the blank panel with a finger. Feed the connector end
in the pop-out hole and run it back to the glove compartment area. The
Euro Alarm LED will snap snugly into the console and you'll immediately
thank yourself for the effort as it looks great! Connect up the LED
connector to the main unit. Mount the valet button in a hidden location
(hence no pictures here) and connect that up to the main unit.
Find a secure spot to mount the main alarm unit and secure it using
tie snaps. I mounted mine to the right side of the picture near where
the floor light is. If you've ever taken this area of your car apart,
you'll know what I'm talking about. Run the antenna away from other
wires. I ran mine up to the open area right below the rightmost vent.
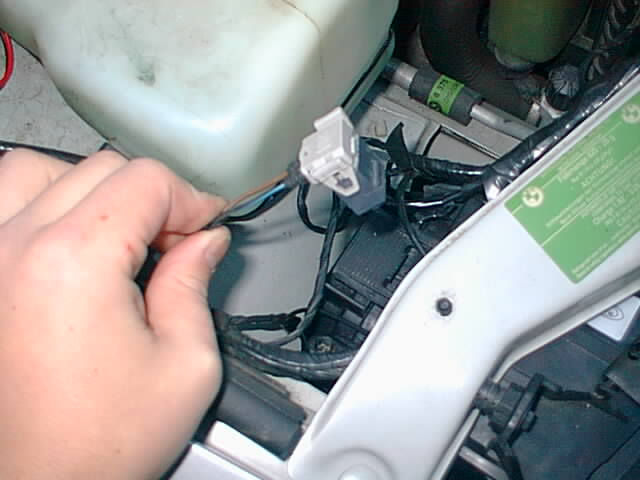
According to the Stellar instructions (what a contradiction!), there
are two siren connectors. One is near the passenger side headlight and
the other is near the jumper terminal. The only connector I could find
was right near my passenger side headlight.
For some strange reason (maybe there is a legitimate reason and maybe
not!) the kit makes you use wire taps to connect the siren to the siren
wires. Wouldn't it have been easier to just put a connector on the end
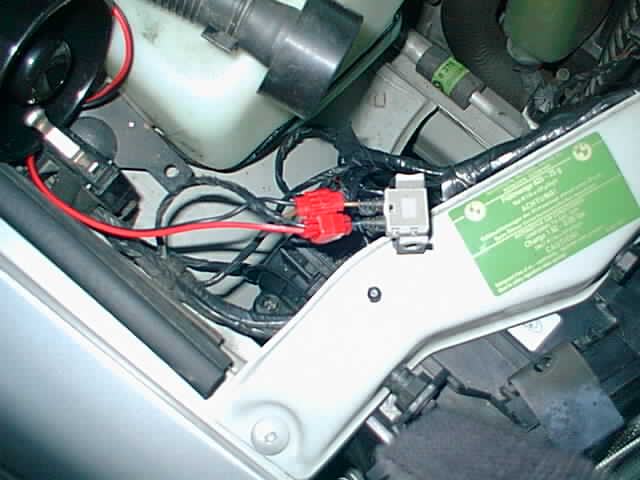
of the siren wires? Regardless, connect the black ground wire of the
siren to the brown ground wire on the connector. Do the same with the
red and the blue wires. Do yourself a favor and use a knife to strip
the wires. I have always found wire taps to be unreliable. If you strip
the wire, you know that there will be a connection. I made the mistake
of trusting wire taps without stripping the wire first on both the Angel
Eye installation and this install and had to troubleshoot the problem
later. Save yourself the trouble and strip them now. Mount the siren
using some self tapping screws.
Now test the system. If everything works as planned, reconnect the
glove compartment.
Warp up all the electrical connections with electrical tape. The Stellar
kit suggests using self tapping screws and drilling them into the metal
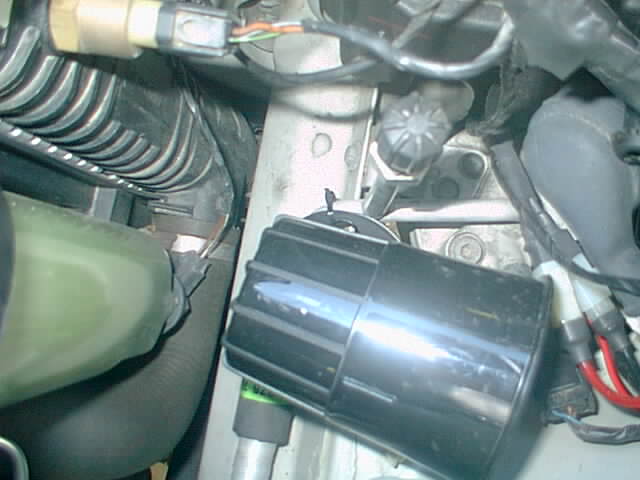
inside the engine bay to secure the siren. At the above picture shows,
I chose to use zip-ties and tied the siren in a somewhat free area near
the radiator on the passenger side of the car directly behind the headlights.
Some gripes include that the instructions could be better. The LED
mounting that they suggest also would look ugly - bit BMW's solution
is the same. I got a packet of photocopied pages. The instructions are
copied in a way that you never know which page is the next page and
the lack of page numbers doesn't help. Additionally, the pages looked
to be photocopied about 100 times and even the text was getting blurry.
Beyond the instructions, this kit could have come with the hardware
needed to mount the siren and a connector that fit into the existing
siren connector would have been nice. Another gripe is about the silent
mode. If you want to arm or disarm the unit in silent mode (since the
siren is loud) you push button two on the remote. Perhaps I misunderstand
this as the instructions only offer a sentence about this feature. Using
button two, I am able to arm the car - the light flash once and the
doors lock. However button two again does not silently disarm the car.
The lights will flash twice signifying the car is unlocked, however
the doors will not unlock? I then need to use button one to first rearm
the car and then to disarm and unlock the car. Why? Perhaps there is
more on Stellar's webpage that will solve this mystery for me? My final
gripe is about the remote. In all honestly, it does not look as nice
as the factory BMW remote.
Despise all the gripes, my impressions on the kit is favorable as of
now. Some good things about the kit is the ease of installation and
that it works nicely with the factory pre-wiring. The range is also
really nice. I tested it from quite a distance and it works as good
if not better than any other remote I've ever used. Lastly, the price
is nice compared to the factory unit.
I'm just so happy that I won't have to use my key to unlock the car
anymore and avoid any accidental paint scratches associated with using
keys (which are usually attached to more sharp keys) to unlock doors.
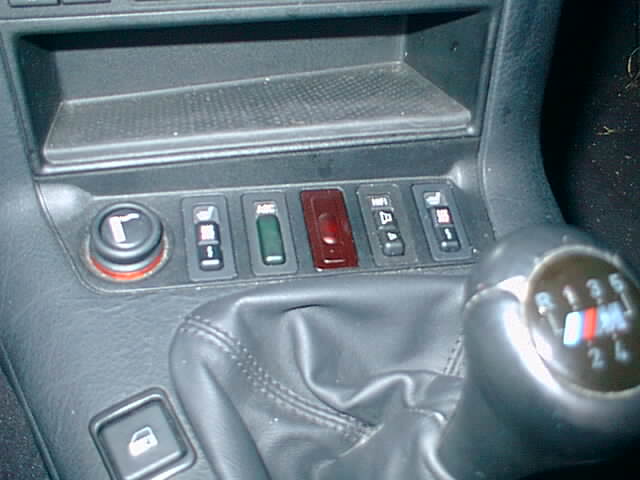
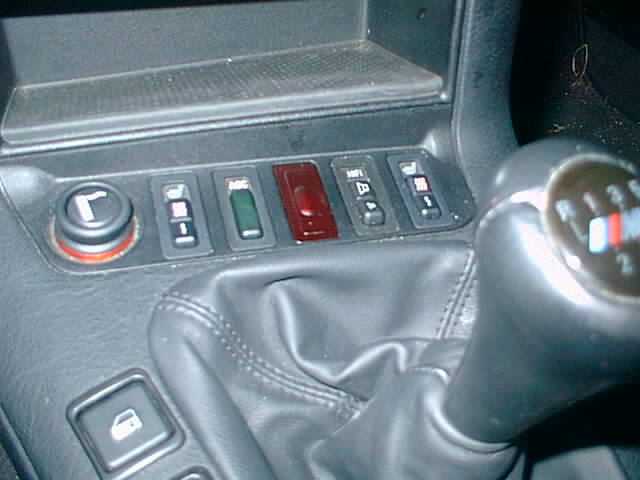
Here are some pictures of the Euro Alarm LED installed. Please note
that due to the flash, the LED unit looks more red than it actually
is. The color of the LED module is actually a very dark red and it blends
in very well with the dark console.